All articles
Performing an Account Backup
Account admins on paid accounts can perform account backups. On Enterprise accounts, it’s possible to restrict admins from performing account backups.
You can perform an account backup to save a local copy of your account's Wrike data.
There are two options for creating an account backup:
Quick (doesn't include attachments)
Full (includes attachments but requires using Wrike's backup tool.
A quick account backup can be requested once per week.
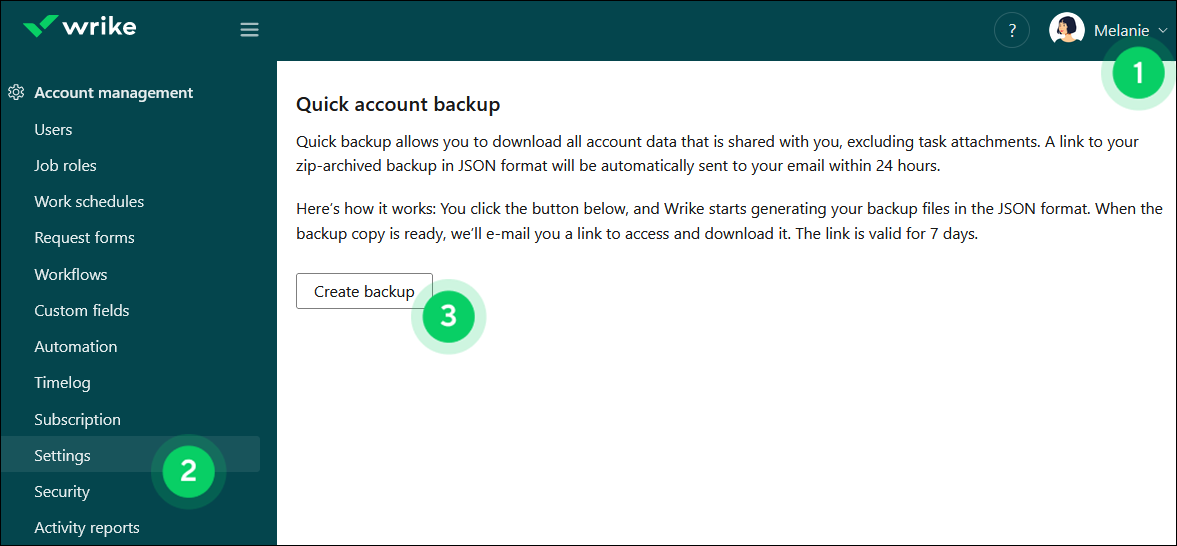
Click your profile image in the upper right-hand corner of your workspace 1.
Select Settings from the drop-down.
(Optional) If you have multiple accounts, use the Select account field to select the appropriate account.
Click Settings in the left-hand panel 2.
Scroll to Quick account backup and click Create backup 3.
-
You should see a pop-up that reads: "Your data is being processed for backup. We’ll email you once the backup is ready." Your backup will be sent via email.
Note
Account backup links are only valid for seven days.
A full backup includes your attachments and requires Wrike's backup tool. To download the backup tool:
Click your profile image in the upper right-hand corner of your workspace.
Select Settings from the drop-down.
Click Settings in the left panel.
Scroll to Full account backup and click Download Backup Tool.
Follow the prompts to download the backup tool file.
Note
You must be familiar with command line script to run this application.
Run the backup tool on Windows
You must have Java Runtime Environment (JRE ver.8) installed. Run the "Java -version" command in the command prompt to check your Java version and update it if necessary.
Unzip wrike-backuptool.zip in a folder dedicated to backups.
-
Open a command prompt from this folder using one of these methods:
Hold Shift on your keyboard and right-click the folder.
Use the Shift+F10 keyboard shortcut to open the extended context menu for a folder and then select Open Command Window Here.
Note
If you don’t see this option on Windows 10, you can skip Steps 2 and 3 and manually open the “backuptool-win.exe” file.
Run backuptool-win.exe in the command prompt window.
Run the backup tool on Mac
You must have these before you start:
Java Runtime Environment (JRE ver. 8 or higher) installed. Run the "java -version" command in your terminal to check your version of Java and update it if necessary.
Java Development Kit (JDK ver. 8 or higher).
Unzip wrike-backuptool.zip in a folder dedicated to backups.
Open a terminal window from this folder.
Execute permission for backuptool-mac.sh: chmod +x backuptool-mac.sh.
Run the file.
Run the backup tool with Linux
You must have Java Runtime Environment (JRE ver.8) installed. Run the "java -version" command in the command prompt to check your Java version and update it if necessary.
-
The first time you run the backup tool, you’ll be asked to provide your Wrike account login and password and the account ID. Your account ID is an eight-symbol string Wrike uses to identify your account for backup purposes. You can quickly copy the ID listed under Your account ID on the same Settings page where you downloaded the backup tool.
Note
If SAML SSO or two-step verification is enabled in your account, you’ll need to generate a one-time password to run the backup. If one-time passwords are disabled for your account, please contact Wrike's Support Team for assistance.
After you run a backup, your Wrike data is saved to your computer in a subfolder named backups/account-account ID. The backup is saved as a zipped JSON file.
You'll see each file's download progress. If the process is interrupted, the backup utility will resume the download from the file that failed.
Each time the backup tool is used (after the initial backup), a new version of the JSON archive is generated and the attachments subfolder is updated with new files and file versions that have been added or modified since the last backup.
The backup tool creates a folder /backups/account-<account ID>/. Inside it there are two folders: /attachments/ and /backup-<backup ID>/. The folder /attachments/ holds all the latest versions of attachments stored in Wrike, and individual files follow the naming convention <attachment ID>-<attachment_file_name>. The folder /backup-<backup ID> contains a zip archive backup-<backup ID>.zip.
The archive has four files in it:
users.json - JSON array of users (firstName, lastName, uid, email, userType: {1 - regular user, 2 - invited user})
[
{
"firstName":"name1",
"lastName":"name2",
"uid":"U2CBMkbSnC9T",
"email":"email@email.tom",
"userType":1
}
]
folders.json
[
{
"id": 16902506,
"children": [21821807, 21821804, 21821749, 21821745, 17006046],IDs of non-deleted folders that reside inside the current folder
"title": "title",
"author": "U2CBMkbSnC9T",UID of the user who created the folder
"dateCreated": "2013-09-02 12:29:24",
"description": "description",
"shared": ["U2CBMkbSnC9T"],An array of user UIDs that have access to the folder
"comments": [
{
"body": "U2CBMkbSnC9T",
"author": "U2CBMkbSnC9T",
"dateCreated": "2013-09-02 12:29:24"
},
{
"body": ".333",
"author": "U2CBMkbSnC9T",
"dateCreated": "2013-09-02 12:29:24"
}
],
"attachments": [this array does not contain attachments from Google Drive, the follow as a separate array
{
"contentType": "application/octet-stream",
"version": 1,
"parentId": 2067818, ID of the folder that the file is attached to
"description": "",
"apiId": "IEAAAEDYIYAB7DLK", Attachment ID that is used to match the file in the /attachments/ folder of the backup with the data in the JSON file
"attachType": "External",
"id": 2067818,
"name": "test+doc+box.webdoc",
"dateUploaded": "2013-04-29 04:48:34"
}
],
"googleDocs": [
{
"resourceId":"1NPu0BlX9hrnSZf1OYh9TyFDoJWEYWxXiC2c01m6PnuY",Google ID of the file"id":2000736,
"name":"test document.doc",
"dateUploaded":"2014-09-02 19:56:43"
}
]
}
]
Possible values of the attachType:
Legacy
Temp
External
ASPost
Task
tasks.json
The structure is similar to folders.json with a notable exception that tasks do not have children (tasks and subtasks are listed together and have no distinction).
[
{
"id": 16902506,
"title": "title",
"author": "U2CBMkbSnC9T",UID of the user who created the task
"dateCreated": "2013-09-02 12:29:24",
"description": "description",
"shared": ["U2CBMkbSnC9T"],array of user UIDs who have access to the task
"comments": [
{
"body": "U2CBMkbSnC9T",
"author": "U2CBMkbSnC9T",
"dateCreated": "2013-09-02 12:29:24"
},
{
"body": ".333",
"author": "U2CBMkbSnC9T",
"dateCreated": "2013-09-02 12:29:24"
}
],
"attachments": [this array excludes Google Drive attachments
{
"contentType": "application/octet-stream",
"version": 1,
"parentId": 2067818, task ID that the file is attached to
"description": "",
"apiId": "IEAAAEDYIYAB7DLK", Attachment ID that is used to match the file in the /attachments/ folder of the backup
"attachType": "External",
"id": 2067818,
"name": "test+doc+box.webdoc",
"dateUploaded": "2013-04-29 04:48:34"
}
],
"googleDocs": [
{
"resourceId":"1NPu0BlX9hrnSZf1OYh9TyFDoJWEYWxXiC2c01m6PnuY",ID of the file in Google
"id":2000736,
"name":"test document.doc",
"dateUploaded":"2014-09-02 19:56:43"
}
]
}
]
teams.json - JSON array of user groups in the account
[
{
"uid": "G~0bzLlmeRUR",
"name": "Group name",
"Members": ["U2CBMkbSnC9T","rk7NvZyWoWbg"] array of UIDs of user who are members of the group
}
]
Enterprise account owners and account admins with the permissions to Configure account settings and Export account data can include BI export data in a backup.
BI export lets you export your account’s data for future import to third-party analytics tools. To include it in the backup:

Click your profile image in the upper right-hand corner of your workspace 1.
Select Settings from the drop-down.
Click Settings in the left panel 2.
Check the Include BI export data in backup box 3.
BI export data will be included to the backup when it's performed by any admin with the rights to both Export account data and Configure Account Settings.